Showing posts with label Decorating. Show all posts

Tuesday, November 5, 2013

Sweet and Simple Redecorating with CozyWallArt

This fall has been a BUSY time in my little studio, making hair bows until my finger prints wear burn off.  I've found the white walled room a little stark though, isolating and uninspiring as I worked at my table facing the blank wall.  Small improvements were made - a candle, more lights, my tablet occasionally propped on the table streaming netflix for some company.

I knew there were many improvements to make, but I simply didn't have the time for a DIY creative solution and needed something simple but somewhat large to fill the empty wall space.


I was thrilled then, to be offered the opportunity to try a beautiful piece of wall art from CozyWallArt.com!  When browsing the site, I came across an image I absolutely fell in love with the Birds Resting on Ribbon Wall Decal.

With three birds sitting together, it reminded me of my own two little "birds" and me - smiling together with hearts full of love.  It also is a reminder of one of my favorite songs to sing to my kids - Way Up High by DidiPop which tells the tale of love birds who meet in the trees and start a happy family together.  So this wall decal was just perfect for us!

I thought installing the piece would be more of a challenge - but it was really SO simple!  It came with great instructions that made the process super simple.


The decal is backed with two sheets of paper backing on both sides. So first, (after lightly washing the wall with a wet rag) we lined tacked the decal to the wall using painters tape.  Using a level, we made sure that our image was straight and right where we wanted it to be.


With a larger piece of tape in the center, we removed the thicker backing between the decal and the wall on one half of our wall art.  Starting from the center and working outward, we used a credit card to press out all the bubbles and ensure the graphic stuck to the wall.  Next,we did the other half.


Finally, we removed the protective thin paper backing on the other side of the image - and that was it!  The whole process took us about 20 minutes and went off without a hitch.


I absolutely adore the end result.  While we could have chosen any color for our image, I think the red on white just looks perfect for this project.  While I think it was much easier with two people, this project could even be done alone in a pinch.  We chose the large (47" x 20") size since we had such a large open space, but with a variety of sizes, theirs bound to be the perfect size for your project!


Isn't this just adorable?  We even decided that the bird on the left must be Julie, is just excited about life with her hands in the air.  I just know this image will offer me the warmth of family and a sweet source of inspiration as I sit crafting away in my studio.


CozyWallArt.com is offering a special coupon offer for our readers.  Enter the code TakeswithTwo20 during checkout and receive 20% off all products.  What a special idea for a Christmas gift or for someone decorating a new baby's nursery!  Act fast though, the coupon code expires December 30, 2013.

Thanks so much to Cozy Wall Art for allowing us to review such a beautiful piece of wall art!  We are so excited to share that they're offering one of our readers the chance to win a $75 gift code to choose their own piece of wall art!

a Rafflecopter giveaway


Don't forget to vote for us every day using the links below.  Your vote helps us offer more great content and giveaways!
Vote For Us @ TopBaby Blogs! The Best Baby Blog DirectoryI'm A Top Twin & Multiple Blogger @ Top Mommy Blogs - Please Click To Give Me A Vote

Tuesday, October 29, 2013

Simple Halloween Decorations

It's hard to believe Halloween is almost here!  We're really starting to get into decorating for holidays since the babies are old enough to get excited.  Just thought I'd share a few of our favorites that make our home a little more "halloweenie!"

DIY Halloween Decorations
These little guys are two large pom-poms (or pom-pons depending on your dialect) glued together - pipe cleaner legs, googly eyes and upholstery thread string.  We hang these from our kitchen "chandelier" above the kids' high chairs for some spooky dining buddies! 

Martha Stewart Bats
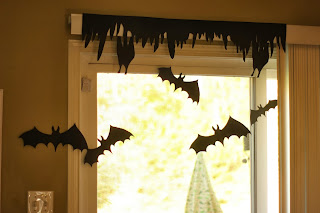
We love these cutout bats from Martha Stewart!  I bought the set last year but believe there's a DIY option somewhere.  I'll be sure to update if I can find the link!  These are on our back sliding door and I love the silhouette it makes.

DIY Pan Scrubber Spider Kids Craft
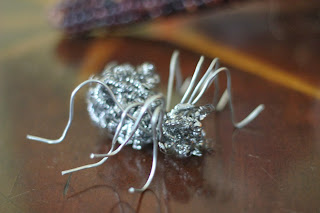
This cutie spider was made courtesy of my friend Sarah at a Girl Scout event.  Made from a silver pot scrubber and soldering wire - these are super cute, easy and even look kinda elegant!  You can find instructions to this easy Halloween craft idea here!  

My mom gave me this lovely apothecary jar for my birthday gift.  I placed a white pillar candle inside to take up some space and help better fill the space with faux leaves and seed pods.

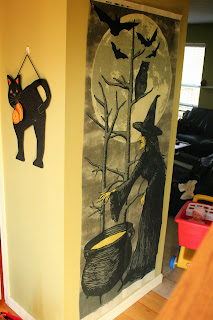
Martha Stewart Crafts Elegant Witch Scene Setter
Another great Martha Stewart find!  It really pop with our green walls and is simply hung with two command adhesive hooks pushed through at the top.  You can still get this from Amazon here!


Easy Halloween Decorating

You may have seen these little guys in our recent post about our new family portrait!  My awesomely creative mom traced one of the bats from the ones on our sliding door - onto some fun foam.  We cut them out and threaded more upholstery thread through a little stitch on their back and hung them from the chandelier.  Brayden especially loves when I lift him and run him through the "batty bats" and let them dangle on his head.  These are one of my favorite things about Halloween!

Martha Stewart Mice


Finally - a much recommended and much missed decoration.  We loved these little paper mice (again) from Martha Stewart.  They were so cute in our front foyer and were really festive.  Unfortunately, a rogue toddler constantly pulled them off the wall and would remove their tails.  They're all gone now, but hopefully we'll be able to replace them in the future!  This photo is the stock photo since ours are mutilated.  They're available for purchase here and M.S. even has a DIY template for the crafty ladies out there.

Hope you enjoyed your little tour and would love to hear about all your favorite simple Halloween decorations!
 Vote For Us @ TopBaby Blogs! The Best Baby Blog DirectoryI'm A Top Twin & Multiple Blogger @ Top Mommy Blogs - Please Click To Give Me A Vote
=